
Several years ago we had the challenge to install more than 300 physical servers as fast as possible. As booting and installing based on PXE was not possible due to not changing external reasons we had to find a different approach. Creating a custom ISO file for every system was also no real option as it would consume a lot of disk space and would be unflexible to handle.
Finally, I got the clearance to write this series of posts and I´m going to explain how I solved that challenge and reduced the pure installation time to only a few hours.
The interesting thing about the complete setup is the ability to install almost any OS and any device anywhere as long as you can establish a connection to a network path or share.
You can exchange the ISO file with a USB stick and run the installation that way. When you have no DHCP available, just set up your embedded IPXE script to a static ip that´s available in your network.
The solution in brief
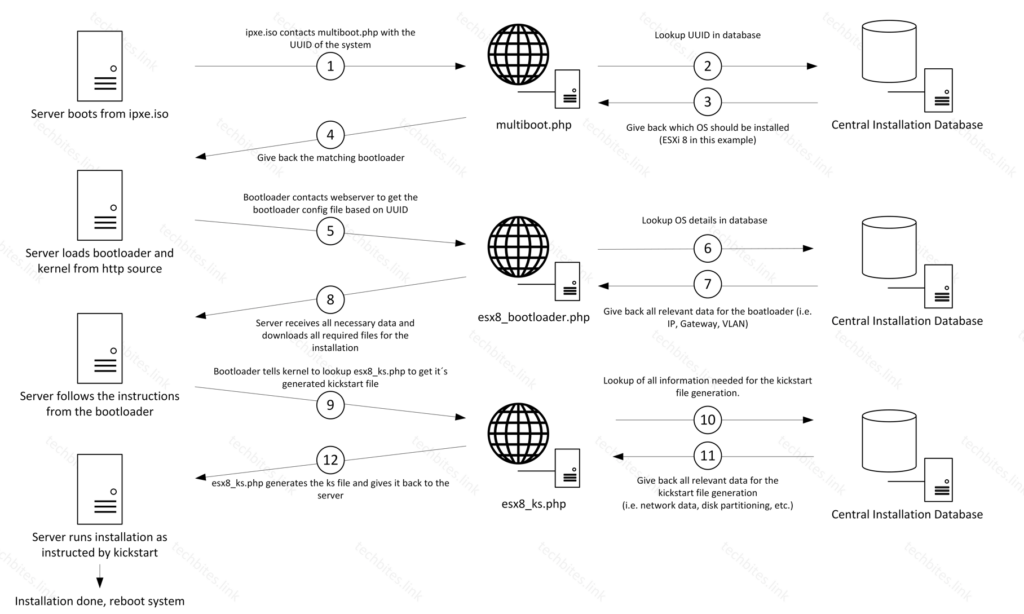
- The UUID of the server together with the desired IP, netmask and all other needed information for an installation were stored in a database.
- A web server and some PHP scripts provide boot parameters and dynamic kickstart files for each system.
- Each server was booted with one general-purpose ipxe.iso file.
- The server booted up, and the ipxe.iso connected to the web server and provided all necessary information.
Prerequisites for the solution
As with all automation topics, the crucial point is to know the hardware or systems to be automated in detail. If you don´t know the name of the network interface or the name or identifier of your disks you´ll get into trouble automating the installation.
A good way to gather that knowledge is to test installations. Install one (or many) of your servers manually and write down all your findings.
Concerning the physical systems, these points were covered:
- Hardware was all the same for one generation of systems, which means every disk and every interface card was in the same slot.
(This is not strictly necessary, but makes the life of the scripter easier) - Unused hardware, i.e. gigabit onboard NICs was disabled via the BIOS/UEFI before the installation.
- Network config on the switches is in place and all necessary VLANs are offered to the server.
- A remote management interface is available (i.e. ILO or iDRAC).
- Custom IPXE boot iso file.
- IMPORTANT: Secure boot must be disabled as long as you don´t want to spend money to certify your installer. As soon as your OS is installed you can turn it on.
Backend Infrastructure
- Webserver with enough space to hold the installation files for all needed operating systems.
- Webserver with a scripting language of your choice, I´ve used PHP.
- A database or similar system to hold all necessary data needed for installation.
- Set of scripts to generate the necessary data
Creation of the IPXE.iso file
The first version of my IPXE.iso was built on a CENTOS7 system, as this is a little bit outdated I´ve rebuilt the file on a freshly installed RHEL9 box.
First, you need some additional packages to compile the ISO file.
sudo yum -y install binutils make perl mtools mkisofs xz-devel.i686 xz-devel.x86_64 git syslinuxThe next step is to clone all necessary data from the IPXE GitHub repository
cd ~
git clone https://github.com/ipxe/ipxe.git
Now you can create an embedded IPXE script which will run when the system boots from the ISO file. Inside that script we use the UUID variable to be passed to the webserver. You could also send additional or different variables, the full list of usable options can be found in the ipxe documentation.
https://ipxe.org/cfgCreate a file with your needed content under ~/multiboot.ipxe
Version without tagged VLAN, the system will test all NICs starting from NIC0, as soon as an interface receives an IP it will try to contact the web server. If this doesn´t work the script will try the next interface and so on.
#!ipxe
dhcp
chain http://<ip of webserver>/multiboot.php?uuid=${uuid}
Version with tagged VLAN 1611 on NIC0 of the system
#!ipxe
vcreate --tag 1611 net0
dhcp net0-1611
chain http://<ip of webserver>/multiboot.php?uuid=${uuid}
After the file is created head to the src directory inside the IPXE directory.
Before the compilation can be done, you have to enable the VLAN options of IPXE. To do so open the file config/general.h and search for the line
//#define VLAN_CMD /* VLAN commands */Remove the two slashes in front, more specifically uncomment the line.
Then you can compile the needed files. You should be in the src directory within the IPXE directory when calling the make command.
make bin/ipxe.lkrn bin-x86_64-efi/ipxe.efi EMBED=~/multiboot.ipxeWhen make has finished compiling all files you can create the ISO file.
./util/genfsimg -o ipxe.iso bin/ipxe.lkrn bin-x86_64-efi/ipxe.efiThat´s it for part 1 of the series, in part 2 we´ll take a closer look at the PHP files on the web server.
Leave a Reply